Call Routing with the Twilio Library for Salesforce

Earlier today I presented a session at TwilioCon: Twilio and Salesforce: Building SMS and Voice into Force.com, covering two simple Twilio/Force.com integrations: SMS lead generation and call routing. Since I blogged the SMS lead generation sample back in April, here is the call routing case.

The code addresses a simple user story: “As a customer service manager, I want callers to be greeted by name and then automatically connected to their account representative.” There are four challenges here:

  • Connecting a voice call with Salesforce
  • Locating the records for the caller and their account rep
  • Responding with the caller’s and rep’s names
  • Redirecting the call to the account rep

Let’s look at each of them in turn.

Connecting a voice call with Salesforce

Twilio provides a markup language for controlling calls: TwiML (Twilio Markup Language). TwiML looks similar to HTML but, instead of marking up paragraphs and headers,  the tags tell Twilio what to do when you receive an incoming call – for example, <say>Hello</say> will read the word ‘Hello’ to the caller. We can use a Visualforce page to render TwiML, with a controller handling the underlying logic. Looking at the controller first, Twilio performs an HTTP GET on a URL, with data such as the incoming caller ID, call ID and account ID sent as query parameters, so our controller’s constructor starts by using the Twilio library to verify the parameters:

// Does the account number on the incoming call match our account number
String accountSid = System.currentPageReference().getParameters().get('AccountSid');
if (accountSid != TwilioAPI.getDefaultAccount().getSid()) {
    throw new TwilioRestException('Account SID mismatch',1);
}

// Check with Twilio that the call identifier on the incoming call is valid
// and in the correct state
String callSid = System.currentPageReference().getParameters().get('CallSid');
TwilioRestClient client = TwilioAPI.getDefaultClient();
TwilioCall call = new TwilioCall(client, callSid);
call.setRequestAccountSid(TwilioAPI.getDefaultAccount().getSid());
if (call.getStatus() != 'ringing') {
    throw new TwilioRestException('Call SID mismatch',1);
}

Locating the records for the caller and their account rep

Now our controller’s constructor can use the incoming caller ID to look up a contact and, from there, the account rep. If we can’t find the matching contact or a matching rep, we use the ‘switchboard’ user.

// Look up contact from incoming caller id
String fromNumber = System.currentPageReference().getParameters().get('From');
List<Contact> callers = (fromNumber == null)
    ? null
    : [SELECT Name, OwnerId
       FROM Contact
       WHERE Phone = :fromNumber OR MobilePhone = :fromNumber];
Contact caller = (callers != null && callers.size() == 1)
    ? callers[0]
    : null;
callerName = caller.Name;

// Look up rep from contact
List<User> reps = (caller == null)
    ? null
    : [SELECT Name, Phone
       FROM User
       WHERE Id = :caller.OwnerId];

// If we don't have a unique rep, connect with switchboard
rep = (reps != null && reps.size() == 1)
    ? reps[0]
    : [SELECT Name, Phone
       FROM User
       WHERE LastName = 'Switchboard'];

Responding with the contact’s and rep’s names

Now that the controller has set up its rep property, the Visualforce page can render TwiML back to Twilio, greeting the caller by name, then explaining that the call with be connected to the named account rep:

<?xml version="1.0" encoding="UTF-8" ?>
<apex:page sidebar="false"
           showHeader="false"
           controller="ConnectorController"
           contentType="application/xml">
  <Response>
    <Say>Hello {!callerName}. Connecting you with {!rep.name}.</Say>
    <Pause/>

I’m exposing the caller name as a String to avoid the need to configure Contacts for access from the site.

Connecting call with account rep

TwiML provides the <Dial> tag to connect the caller to the given number:

    <Dial>{!rep.phone}</Dial>
  </Response>
</apex:page>

I’ve dropped the Visualforce page and controller code into a gist. If you want to try it out, you’ll need to install the Twilio Library for Salesforce, create a Twilio account (if you don’t already have one), and configure the TwilioConfig custom setting with your account credentials.

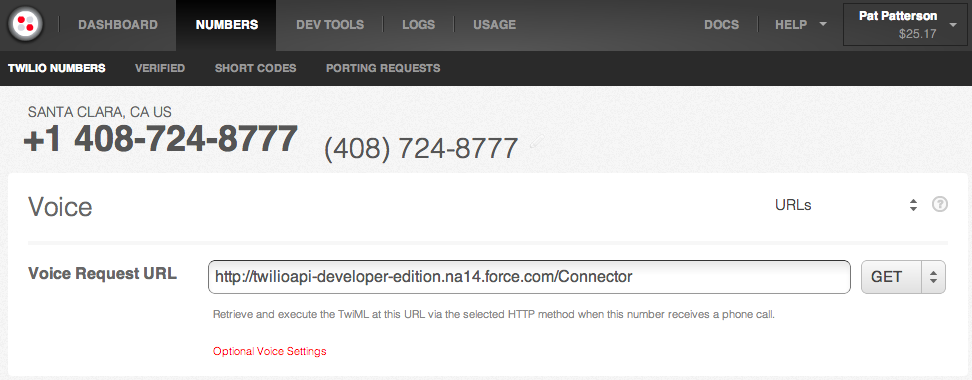
With the Twilio library installed and configured, and the Connector page and ConnectorConfig class in place, you’ll need to configure a site and follow the instructions here to make the Connector page publicly visible. Create a phone number at Twilio, set your new page as its Voice Request URL, and dial away…

tagged , Bookmark the permalink. Trackbacks are closed, but you can post a comment.
  • http://twitter.com/shobyabdi shoby abdi

    Thanks for posting this Pat. This is really getting the creative juices going.

  • joseph12

    Twilio provides a markup language for controlling calls.Thanks for sharing it.

    Php Programmer India

  • Anonymous

    I have cloned Twilio locally and now i am trying to integrate Salesforce with Twillio. I have followed all the directions and edit build.xml by entering my parameters. Now when i am trying to deploy Twilio from the command line, it keeps giving me the error messages. i have corrected the script according to error messages.
    I am doing this to track our campaign calls and it is just not getting done. What am I doing wrong? Could anyone help me please? Many thanks in advance.
    Here is the error message (one of them):

    BUILD FAILED
    /Applications/salesforce_ant_27.0/sample/build.xml:10: Problem: failed to create task or type antlib:com.salesforce:deploy
    Cause: The name is undefined.
    Action: Check the spelling.
    Action: Check that any custom tasks/types have been declared.
    Action: Check that any / declarations have taken place.
    No types or tasks have been defined in this namespace yet

    This appears to be an antlib declaration.
    Action: Check that the implementing library exists in one of:
    -/usr/share/ant/lib
    -/Users/mirandabaghashvili/.ant/lib
    -a directory added on the command line with the -lib argument